🔥 Induction Stove Heat ஆகவில்லையா? இந்த 5 Faults வீடிலேயே Fix பண்ணலாம்!
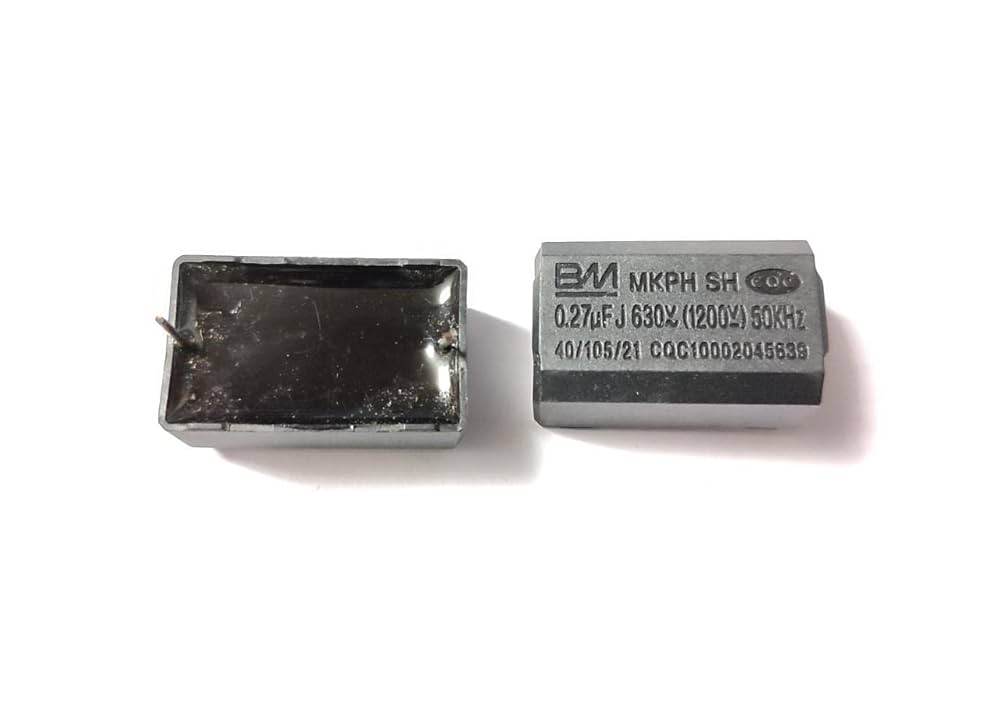
1. Capacitor Burst – Main Capacitor
Induction stove board-ல் உள்ள Main Film Capacitor (typically 2.2μF to 5μF, 400V–630V) தான் voltage conversion மற்றும் oscillation-க்கு முக்கியமாக செயல்படுகிறது. இது burst ஆகும்போது stove completely heat செய்யாது அல்லது intermittent heating error வரும்.
அடையாளம் காண்பது எப்படி?
- Capacitor puffed/bulged இருப்பது肉眼 பார்த்தாலே தெரியும்.
- Plastic wrap burnt / discolored இருக்கலாம்.
- Multimeter-ல் “Cap” mode இருந்தால் µF value check பண்ணலாம்.
- Zero capacitance or unstable value இருந்தால் அது burst ஆகி இருக்கலாம்.
Fault Symptoms:
- Stove ON ஆகும் ஆனால் heating இல்லை.
- Stove suddenly shuts off after few seconds.
- Buzz sound வராமல் இருக்கலாம் (coil engage ஆகவில்லை என்பதற்கான அறிகுறி).
புதிய Capacitor Fix செய்வது எப்படி?
- Stove unplug பண்ணி board-ஐ remove பண்ணவும்.
- Old capacitor-ஐ desolder பண்ணி out பண்ணவும்.
- Soldering gun, wick அல்லது pump உபயோகிக்கவும்.
- New capacitor-ஐ same polarity-யில் insert பண்ணி solder பண்ணவும்.
- Capacitor voltage rating ≥ original capacitor-க்கு சமமாகவோ அதிகமாகவோ இருக்கலாம். µF value match செய்ய வேண்டும்.
Extra Tip: சில Chinese stoves-ல் capacitor மற்றும் IGBT ஒன்றாக fuse ஆகும். Capacitor burst ஆன பிறகு IGBT அல்லது Diode-ஐயும் parallel-ஆ check பண்ணுவது நல்லது.
பிழைகள் தவிர்க்க: சிலர் capacitor value blindly guess செய்து தவறான µF capacitor போட்டுவிடுகிறார்கள். இது either heat failure அல்லது board damage உருவாக்கும்.
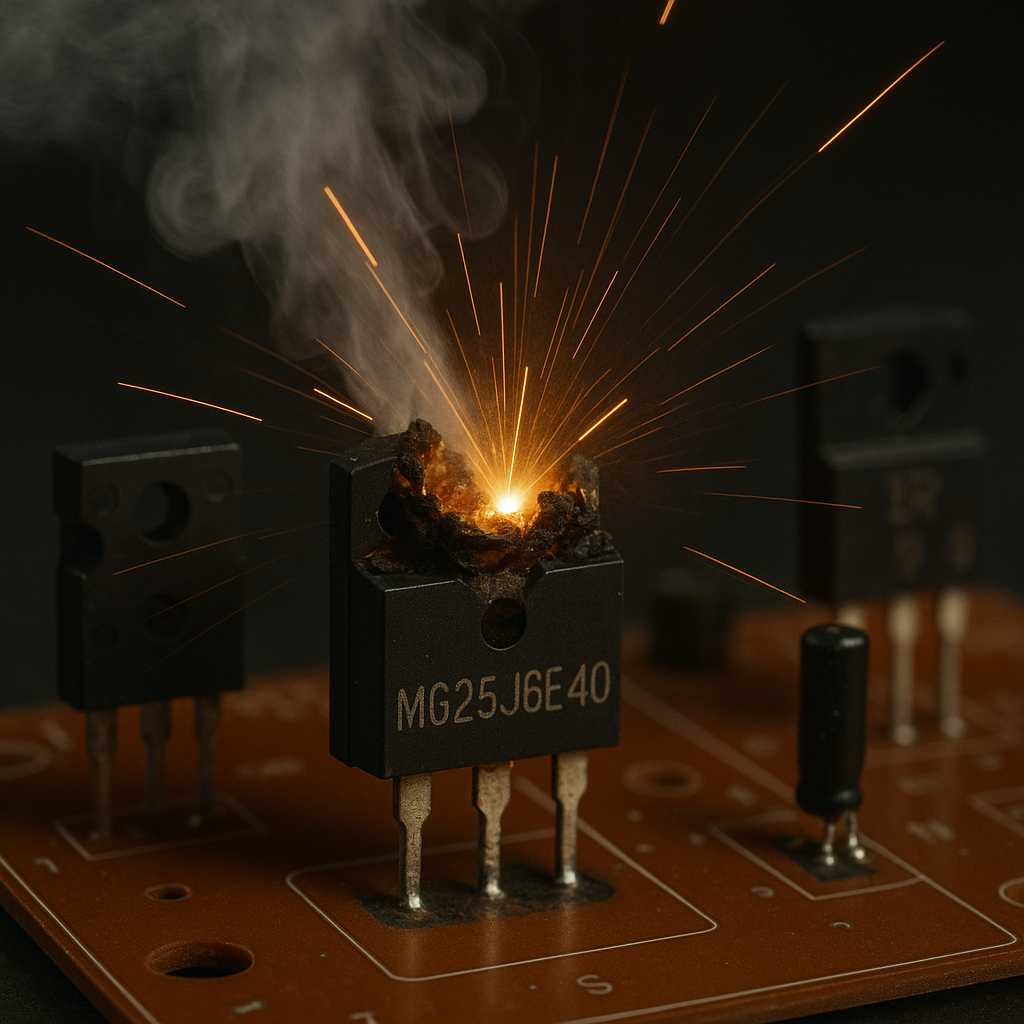
2. IGBT Short – Power Transistor Damage
IGBT (Insulated Gate Bipolar Transistor) என்பது high-frequency switching-க்கு முக்கியமாக செயல்படுகிறது. Induction stove-ல் coil-க்கு required voltage generate செய்ய இதுவே முக்கியமான controller. இதுவே short ஆயிருந்தால் power transfer தடைபடும் மற்றும் heating நடக்காது.
IGBT fault அறிகுறிகள்:
- Stove suddenly turns off or doesn’t start heating
- Buzz sound completely missing (coil doesn’t get power)
- Board fuse blows when turned ON
- Multimeter-ல் both collector-emitter direction continuity (short indication)
Test செய்வது எப்படி?
- Board-ஐ வெளியே எடுத்து, IGBT-ஐ identify செய்யவும் (மிகவும் பொதுவான models: 25N120, 20N60, G40N60).
- Multimeter-ஐ Diode mode-க்கு மாற்றவும்.
- Collector ↔ Emitter, Gate ↔ Emitter இடையே test செய்யவும். எந்த direction-யிலும் 0℅ அல்லது 0.00V இருந்தால் short.
- இரு direction-லும் low resistance வந்தால், அது full short ஆகி இருப்பது.
மாற்றுவது எப்படி?
- Old IGBT-ஐ desolder பண்ணி, heat sink-ஐ detach பண்ணுங்கள்.
- New IGBT-ஐ insert செய்து thermal paste வைத்து tighten செய்யவும்.
- Solder leg connection properly without shorting.
சில நேரங்களில்: IGBT மட்டும் short ஆகாமல், அதை drive பண்ணும் gate resistor அல்லது gate diode-களும் damage ஆகியிருக்கும். எனவே Gate signal path-ஐயும் check பண்ணுவது நல்லது.
பொதுவான மாற்று IGBT Models:
- 25N120 – 25A, 1200V (High Power)
- G40N60 – 40A, 600V (Fast Switching)
- 20N60 – 20A, 600V (Common Chinese board usage)
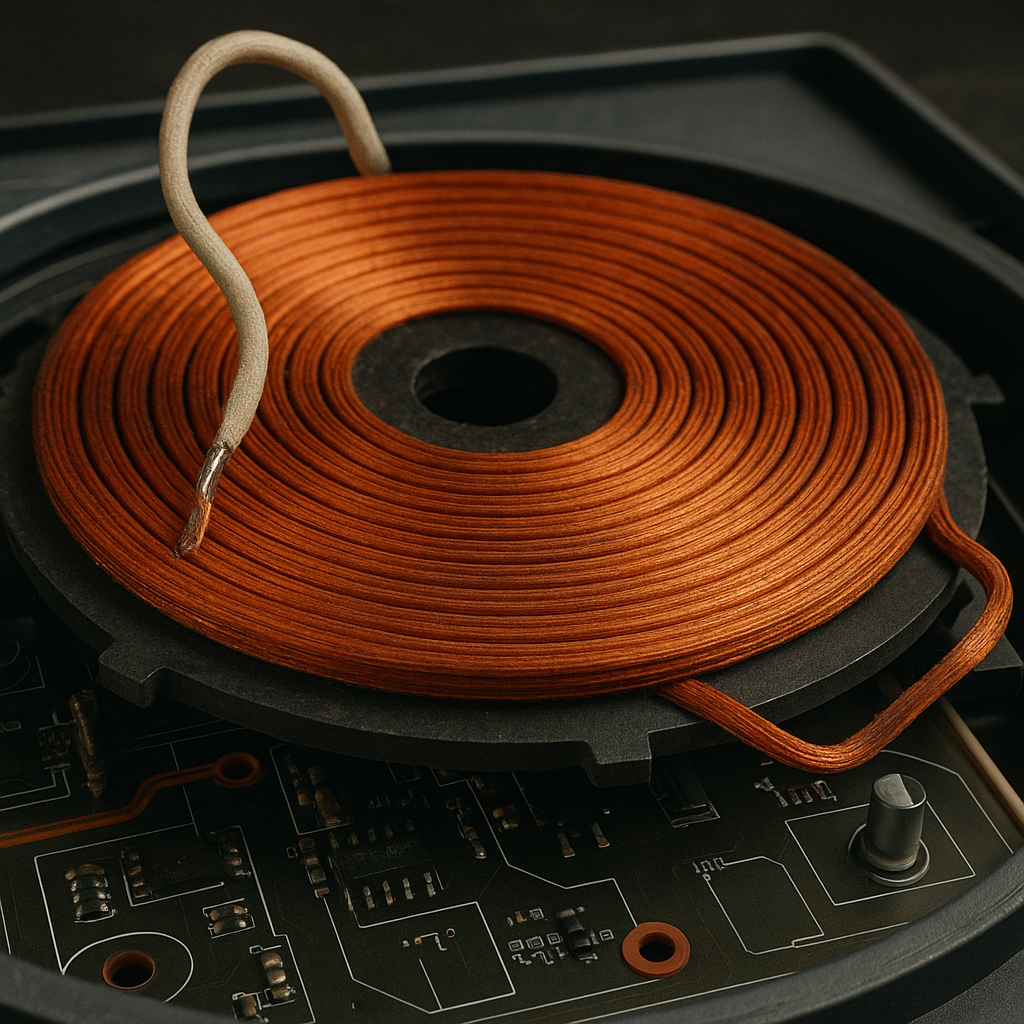
3. Coil Loose / Open
Induction stove-ல் copper coil என்பது electromagnetic signal-ஐ pan-க்கு generate பண்ணும் முக்கியமான component. இது board-க்கு கீழே இருக்கிறது. இந்த coil loose ஆனாலோ, open ஆகிவிட்டாலோ signal pass ஆகாது. இதன் காரணமாக heating ஏற்படாது.
Common Coil Fault Symptoms:
- Stove ON ஆகும், fan rotate ஆகும் – ஆனால் heat இல்லை
- No buzz sound from the coil area
- Sometimes shows Error code like “E0”, “E2”, “No Vessel”
- Intermittent heating (நேரில் கோயிலில் பிழை இருப்பது போல நடக்கும்)
Continuity Check செய்யும் முறை:
- Stove unplug பண்ணி, back panel-ஐ திறக்கவும்.
- Coil terminals (2 thick copper wires) multimeter-ல் connect செய்து continuity mode-ல் check செய்யவும்.
- Beep sound வந்தால் coil OK; இல்லையெனில் open circuit.
- Sometimes, soldering crack-ஆயிருந்தால் reflow soldering போதுமானது.
பழுதுபார்க்கும் வழிகள்:
- Coil wire-ஐ board-க்கு solder செய்த இடத்தில் crack இருந்தால் அதை fresh solder பண்ணுங்கள்.
- Coil terminal loose-ஆ இருக்குமானால் screw tight பண்ணவும்.
- Some models-ல் thermal pad மற்றும் insulation sheet remove செய்து wire re-connect செய்ய வேண்டும்.
பழுது காரணமாக வரக்கூடிய சில extra errors:
- IGBT overheat due to feedback failure from coil
- Temperature sensor readings mismatch
- Coil fully damaged → Need replacement (very rare)

4. Diode Fault – Fast Recovery Diode
Induction stove board-ல் fast recovery diode-கள் (IN5408 / FR107) power supply path-ல அல்லது IGBT gate protection-க்காக பயன்படுத்தப்படுகின்றன. இவை short ஆயிருந்தால் current signal block ஆகும் அல்லது feedback error வரும்.
பழுதுக்கான அறிகுறிகள்:
- Stove ON ஆகும்போது Fuse repeatedly blown ஆகும்
- Board light ON ஆனாலும் heating அல்லது display response இல்லை
- IGBT fails frequently due to unprotected gate
Test செய்யும் முறை (Diode Mode):
- Multimeter-ஐ Diode mode-க்கு மாற்றவும்
- Diode-ன் ஒரு மூலையில் positive probe, மற்ற மூலையில் negative probe வைக்கவும்
- Forward bias-ல் ~0.5V – 0.7V reading வந்தால் OK
- Reverse-ல் OL (no reading) வந்தால் OK
- இரு direction-லும் 0 அல்லது value வந்தால் diode short ஆகி இருக்கிறது
வழக்கமான diode positions:
- Input AC line protection
- IGBT gate flyback protection
- Snubber circuit area
Replace செய்யும் போது கவனிக்க:
- Same model அல்லது high-voltage diode மட்டும் பயன்படுத்தவும் (Ex: FR207, HER108)
- Diode orientation தவறாமல் solder செய்ய வேண்டும் – otherwise power short
- Use tweezer or clamp while desoldering – heat sensitive
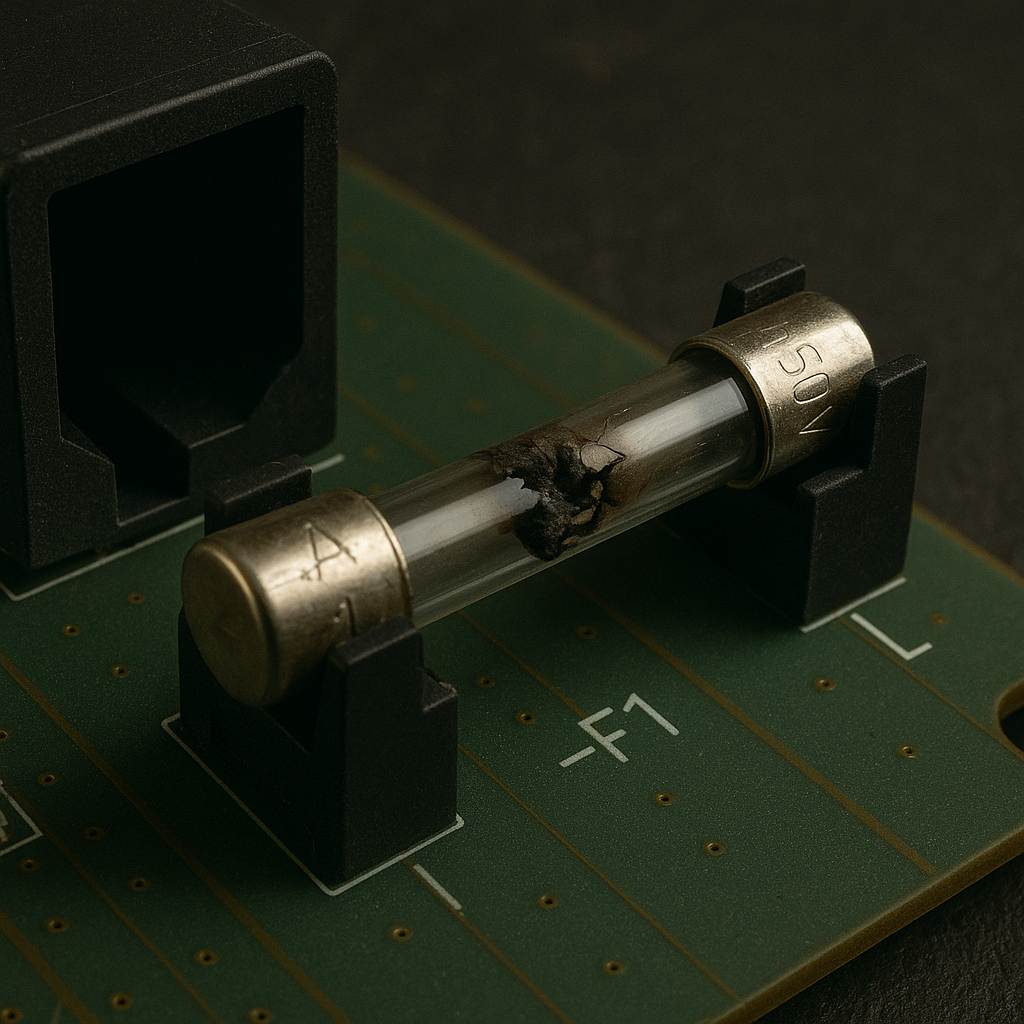
5. Fuse Blown – Power Entry Issue
Induction stove board-ல் AC input-க்கு பிறகு glass fuse இருக்கும். இது circuit-ஐ overcurrent அல்லது short circuit protection-க்கு பாதுகாக்கும். Fuse blown ஆகியிருந்தால் board-க்கு power செல்லாது – இதனால் stove power ON ஆகவே மாட்டாது.
பழுதுக்கு அறிகுறிகள்:
- No display, no beep, no fan – stove dead condition
- AC power plug perfectly working இருந்தாலும் response இல்லை
- Fuse visibly broken, blackened, or continuity இல்லை
Fuse test செய்வது எப்படி?
- Stove unplug செய்து, fuse-ஐ desolder செய்யவேண்டியதில்லை – board-லேயே test பண்ணலாம்
- Multimeter continuity mode-ல் fuse-க்கு இரண்டு முனைகளும் connect செய்யவும்
- Beep sound or continuity reading இருந்தால் fuse OK
- OL அல்லது no reading வந்தால் fuse blown
Fuse மாற்றும் போது கவனிக்கவேண்டியவை:
- Fuse rating: 250V, 2A–5A glass fuse most common
- Same rating-ஐ மட்டுமே மாற்றுங்கள் – high amp fuse போட்டால் board-ல் diode/IGBT damage ஏற்படும்
- Fuse holder loose solder-ஆக இருக்கலாம் – re-solder பண்ணவும்
Fuse Blown Example: Fuse பறக்கும்போது சிறிய “tick” sound வரும். சில fuse-ல் inside wire fully burnt இருக்கும். சில நேரங்களில் visually fuse OK போல தெரிந்தாலும் inside wire cut ஆகியிருக்கும் – அதனால்தான் multimeter test அவசியம்.
🔚 Final Tips – Induction Stove Repair Checklist
- 🔌 Always unplug the stove before opening. Even small capacitors can store dangerous voltage.
- 🧠 Basic electronics knowledge அவசியம் – Multimeter, polarity, and continuity concepts தெரிந்து வைத்திருங்கள்.
- 🔧 Use proper tools: Soldering iron, multimeter, and ESD-safe screwdriver kit கொண்டு வேலை செய்யவும்.
- 📷 Before disassembling, take clear photos of wiring and board layout – reassembly easy ஆகும்.
- 🧪 Test each component one by one – Capacitor, IGBT, Diode, Fuse, Coil etc. ஒரு சேர மாற்ற வேண்டாம்.
- 🔁 Repeated fuse damage என்றால், internal short circuit-ஐ கண்டுபிடித்து தவறான component-ஐ மட்டும் மாற்ற வேண்டும்.
- ⚠️ Board re-solder செய்த பிறகு, PCB cleaning (IPA or brush) செய்தால் carbon trace issues தவிர்க்கலாம்.
📹 Bonus Video
Watch step-by-step Tamil repair guide: