Install JDK + VS Code/IntelliJ Setup
+ Your First Java Program (Windows)
If you are a beginner, the biggest confusion is: “Java install panniten… ஆனா terminal-la java / javac work ஆகல!” Don’t worry. This guide will help you install JDK properly, set JAVA_HOME and PATH, setup VS Code or IntelliJ IDEA, and run your first program successfully.
Table of Contents
Jump1) Before you start (What you need)
ChecklistBefore installing, keep these ready:
- Windows 10/11 PC (Admin access preferred)
- Stable internet connection
- One code editor: VS Code (lightweight) or IntelliJ IDEA (best for Java)
- Basic folder like: C:\java-projects for your practice files
Also remember: If you want to write Java programs, you must install JDK (Java Development Kit). Installing only “JRE” is not enough for compiling your code.
2) Download & Install JDK (Windows)
Step-by-stepThere are many JDK distributions (Oracle JDK, OpenJDK builds). For beginners, choose a trusted one and stick to it. Common safe options:
- Oracle JDK (official)
- Eclipse Temurin (Adoptium) (popular OpenJDK build)
- Microsoft Build of OpenJDK
Installation steps (simple):
- Download the JDK installer for Windows (x64).
- Run the installer → Next → Next.
- Choose install folder (default is OK). Example: C:\Program Files\Java\jdk-21
- Finish installation.
After install, we will verify using terminal and then set environment variables if needed.
3) Verify Java Installation (Most Important Step)
Must doOpen Command Prompt or PowerShell and run:
java -version
javac -version
If both show versions, your JDK is installed correctly and your PATH is already set. If you see an error like not recognized as an internal or external command, you must set PATH.
4) Set JAVA_HOME (Windows)
Environment variableSome tools (Gradle, Maven, IDEs) use JAVA_HOME to find your JDK. Setting it correctly avoids many future issues.
Steps:
- Search in Windows: Edit the system environment variables
- Click: Environment Variables…
- Under System variables → Click New
- Variable name: JAVA_HOME
- Variable value: Your JDK path Example: C:\Program Files\Java\jdk-21
- Click OK → OK.
Correct: C:\Program Files\Java\jdk-21
Wrong: C:\Program Files\Java\jdk-21\bin
5) Set PATH (Fix: ‘java is not recognized’)
TroubleshootingPATH tells Windows where to find commands like java and javac. If PATH is missing, terminal cannot find them.
Steps:
- Open: Edit the system environment variables
- Click: Environment Variables
- Under System variables → select Path → Edit
- Click New and add: %JAVA_HOME%\bin
- OK → OK → Restart terminal (very important)
Now re-check:
java -version
javac -version
6) VS Code Setup for Java
Beginner-friendlyVS Code is lightweight and great for learning. To code Java easily, you should install the Java extensions.
Step-by-step:
- Install VS Code (if not installed).
- Open VS Code → Extensions (Ctrl+Shift+X).
- Search and install: Extension Pack for Java.
- Optional but useful: Code Runner (for quick runs).
- Restart VS Code.
1) Use the Run button (after extension installs)
2) Or compile/run in terminal using javac and java
Once the Java extension is installed, VS Code will detect your JDK automatically (if JAVA_HOME / PATH is correct). If it doesn’t detect, reopen VS Code after setting variables.
7) IntelliJ IDEA Setup (Community Edition)
Best for JavaIntelliJ IDEA is considered one of the best IDEs for Java development. Even the free Community Edition is powerful for learning and projects.
Create your first Java project:
- Install IntelliJ IDEA Community Edition.
- Open IntelliJ → New Project.
- Select Java.
- Choose your JDK (it will show installed JDK; else browse and select JDK folder).
- Project name: JavaBasics (example)
- Finish → Create a class → Run.
8) Your First Java Program (HelloWorld)
Hands-onLet’s create the classic first program. Create a folder: C:\java-projects\lesson3 and create a file named: HelloWorld.java
public class HelloWorld {
    public static void main(String[] args) {
        System.out.println("Hello, Java! ✅ Setup successful.");
    }
}
Compile and Run using Terminal:
cd C:\java-projects\lesson3
javac HelloWorld.java
java HelloWorldNow try changing the message and run again. This is how you build confidence. Always type the code yourself and run it.
9) Common Errors & Fixes (Beginner)
TroubleshootError 1: java is not recognized…
Fix: Set PATH correctly and restart terminal. Verify using:
where java
where javac
java -version
javac -version
Error 2: Could not find or load main class
Fix: Ensure you are in the correct folder and you used correct class name. Run without .class.
Error 3: class HelloWorld is public, should be declared in a file named HelloWorld.java
Fix: File name must match the public class name exactly.
Error 4: VS Code shows Java extension issues
Fix: Install “Extension Pack for Java”, restart VS Code, ensure JDK is installed and detected.
10) Best Practices (Make your learning smooth)
Pro tips- Create a dedicated folder for practice: C:\java-projects
- One lesson = one folder (clean learning)
- Always match file name and class name
- Use LTS JDK versions
- Learn terminal compile/run at least once (strong foundation)
- Write code daily (30–45 minutes)
11) Practice Tasks (Do today)
Exercises- Run java -version and take a screenshot for your notes.
- Create 3 programs: HelloWorld, AboutMe, MyGoal.
- Compile and run all programs using terminal commands.
- Change file name wrongly and see the error. Fix it again.
- Try both VS Code and IntelliJ once (choose one for daily use).
// AboutMe.java (Try this)
public class AboutMe {
    public static void main(String[] args) {
        System.out.println("Name: ______");
        System.out.println("City: ______");
        System.out.println("Goal: Java Zero to Hero!");
    }
}
Recommended Internal Links (SEO)
Keep users learningBuy link :
Contact
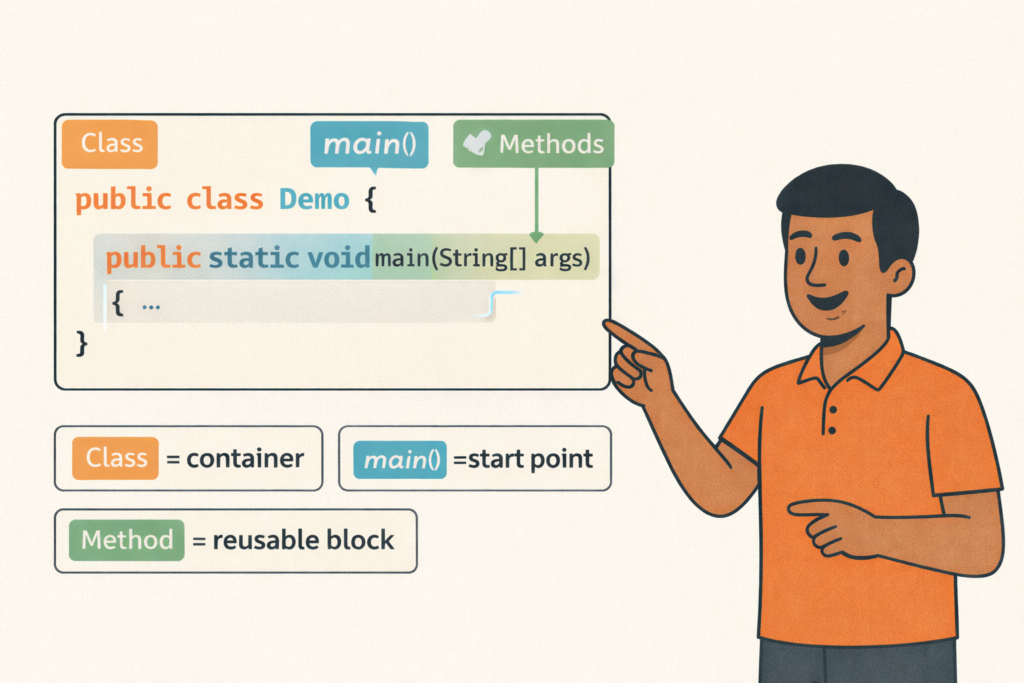
Java Program Structure (Class, main, Methods)– Full Beginner Explanation
Java Program Structure (Class, main, Methods) – Beginner Guide | Tamil Technicians TT Tamil Technicians…

Install JDK + VS Code/IntelliJ Setup+ Your First Java Program (Windows)
Install JDK + VS Code/IntelliJ Setup + First Java Program (Windows) | Tamil Technicians TT…
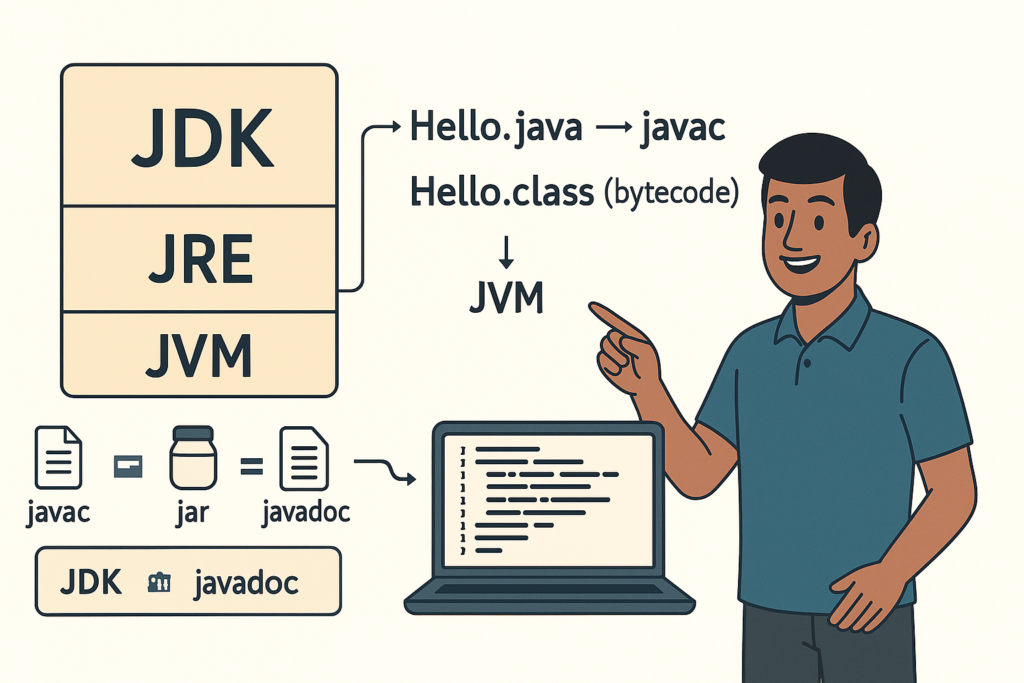
JDK vs JRE vs JVM – Easy Explanation(Compile & Run Flow for Beginners)
JDK vs JRE vs JVM – Easy Explanation (Beginner Guide) | Tamil Technicians TT Tamil…
Java Introduction & Where Java is Used(Apps, Web, Banking, Android)
Java Introduction & Where Java is Used (Apps, Web, Banking, Android) | Tamil Technicians TT…